The Gladys project is “Your home assistant on your Raspberry Pi built with Node.js”. It allows developers to add new functionality in the form of Modules. This is a small tutorial on getting your environment ready for development of a module.
For now I assume the the following two folders on your filesystem:
A npm install version of Gladys in /home/user/Gladys. (Perform the command npm install gladys in the folder /home/user/gladys). Your own module in /home/user/github/gladys-module. Make sure that you update these paths to your local situation in any code examples you see in this post.
Create a new repository in github where the module will reside. The commands below will initialize a local git repository for the module, and create a NPM module for it. Fill in anything you want for the data requested in the npm init command.
cd /home/user/github/
git clone https://github.com/user/gladys-module
cd gladys-module
npm init
Now we want to be able to easily develop the module within Gladys, we means that we have to be able to update it, inside the folder (/hooks) where Gladys stores the modules. But since git does not allow a git repository within a different repository we take a different approach.
If you did not do this already, configure your local Gladys installation in /home/user/Gladys, as described in the readme.
Module initialization
Place the following index.js file in your module code, commit it and push to Github. This will result in a module which does nothing.
module.exports = function(sails) {
    return {
    };
}
Run Gladys in development mode
Sails.js is the framework on which Gladys is build. The author of Gladys has provided a simple start-up script to start Gladys in development mode. To run it, simply do: node dev.js. It will generate some output. If you do not have the sails command installed, it will print an error and explain that it needs to be installed. To install it locally run npm install sails, to install globally run sudo npm install -g sails. After running node dev.js, your console window should look something like this:
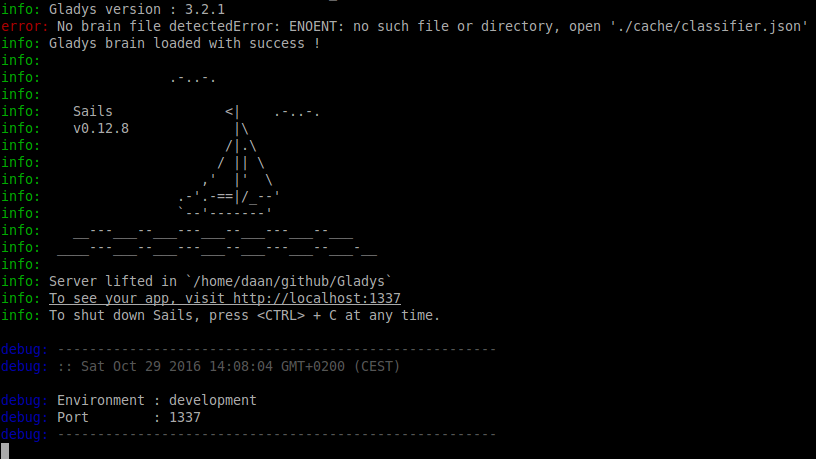
You can now access your local Gladys installation at http://localhost:1337, lifted means that the server is running.
Install module
Gladys allows you to install a module via the Module store, or via a github URL. The first one is not an option, since the module is in development, it is not available in the store yet. If we install the module via the module Github URL then Gladys will download and install your module.
#Module development The module is now cloned in /home/user/Gladys/api/hooks/. Here you can make changes to it, and when done, commit and push to Github. You can invoke any function you’d like to test from a script, there is no need to reproduce the function hook from Gladys itself. From a script you can use:
gladys.modules.test.function(...)
Where test is the slug of your module, and function is one of the functions exported by your module. Also remember that you need to restart Gladys to apply any changes you have made.
Read more about the subject on the developer documentation. Also look at the existing modules at the Gladys github page.