On an AWS EC2 instance I needed to find the contents of the X-Forwarded-For header of incoming requests, send by CloudFront. The easiest way was to dump all incoming traffic on port 80:
Andrew Rogers has been kind enough to create a pre-built Spotify plugin for foobar2000. Next to that he also explain how you can built it yourself. You do need a Spotify Premium account to be able to use this.
To add a track, artist or playlist, you can simply do File -> Add Location… Here you have to paste a Spotify link, which starts with spotify:.
The Gladys project is “Your home assistant on your Raspberry Pi built with Node.js”. It allows developers to add new functionality in the form of Modules. This is a small tutorial on getting your environment ready for development of a module.
For now I assume the the following two folders on your filesystem:
A npm install version of Gladys in /home/user/Gladys. (Perform the command npm install gladys in the folder /home/user/gladys). Your own module in /home/user/github/gladys-module. Make sure that you update these paths to your local situation in any code examples you see in this post.
Create a new repository in github where the module will reside. The commands below will initialize a local git repository for the module, and create a NPM module for it. Fill in anything you want for the data requested in the npm init command.
cd /home/user/github/
git clone https://github.com/user/gladys-module
cd gladys-module
npm init
Now we want to be able to easily develop the module within Gladys, we means that we have to be able to update it, inside the folder (/hooks) where Gladys stores the modules. But since git does not allow a git repository within a different repository we take a different approach.
If you did not do this already, configure your local Gladys installation in /home/user/Gladys, as described in the readme.
Module initialization
Place the following index.js file in your module code, commit it and push to Github. This will result in a module which does nothing.
module.exports = function(sails) {
    return {
    };
}
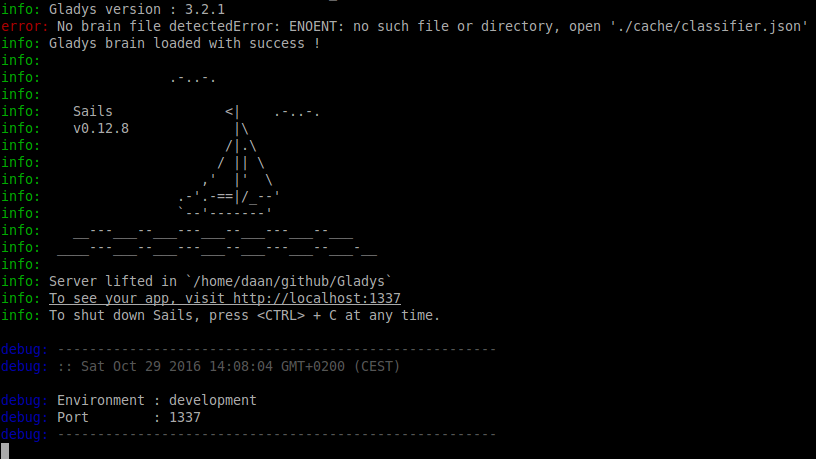
Run Gladys in development mode
Sails.js is the framework on which Gladys is build. The author of Gladys has provided a simple start-up script to start Gladys in development mode. To run it, simply do: node dev.js. It will generate some output. If you do not have the sails command installed, it will print an error and explain that it needs to be installed. To install it locally run npm install sails, to install globally run sudo npm install -g sails. After running node dev.js, your console window should look something like this:
You can now access your local Gladys installation at http://localhost:1337, lifted means that the server is running.
Install module
Gladys allows you to install a module via the Module store, or via a github URL. The first one is not an option, since the module is in development, it is not available in the store yet. If we install the module via the module Github URL then Gladys will download and install your module.
#Module development The module is now cloned in /home/user/Gladys/api/hooks/. Here you can make changes to it, and when done, commit and push to Github. You can invoke any function you’d like to test from a script, there is no need to reproduce the function hook from Gladys itself. From a script you can use:
gladys.modules.test.function(...)
Where test is the slug of your module, and function is one of the functions exported by your module. Also remember that you need to restart Gladys to apply any changes you have made.
This article explains in a few simple steps how to find and remove unnecessary files from your git repository. The example is by removing unused binary files which were added when it was still a subversion repository. This method is useful to clean up old files for which version control or history is not important.
When you want to use your own SSL certificate on Cloudfront, you must upload your certificate to IAM. In order for the certificate to be usable at cloudfront, its path must be prefixed with /cloudfront/, else it will not show up in the list.
The information below is distilled from a forum post at the AWS forum. The explanation is for when you are use the aws cli to upload the certificate (which is the only possible way at the moment of writing this post).
As a Windows user I expect that the webbrowser I use to trigger a ‘back to previous page’ action when I press the backspace key. In the Linux installations I have used that is not the case by default.
For Firefox, my default browser choice, this is easily changed:
Navigate to about:config then set browser.backspace_action to 0 (it was set to 2 for me).
On Openshift you can deploy a multitude of applications. You do this by adding the code to a git repository and pushing the result to the Openshift servers. In some cases, when you are already developing the code and you don’t want to manually copy the changes to the openshift checkout it is cumbersome to keep this in sync.
Remote git url during creation
The simplest solution is to, during the creation of your application, specify a remote git url to store the app data in. If for some reason you do not want that (repository is not public for example), there is another way to fix this.
Local branch
In this solution, a branch on your local repository will be used to push the code to the master of the Openshift repository. This solution is based on a Stack Overflow post.
Application creation
First, create the Openshift application using the normal flow and checkout the git repository linked to this application. We do this, because we want the contents of the .openshift folder, this is used by Openshift for configuration of the Cartridge. We will later overwrite the data in this repo with our own local git repository.
Preparing the local branch
In your own git repository with the existing code, branch from the master (or any other branch you want to openshift code to be based on):
We have just created a local branch called openshift, and added a remote repository called openshift. We will be committing changes to the local branch and pushing them to the openshift repo.
Now copy the .openshift folder from the checkout done earlier and copy this to your local openshift branch. After this modify any configuration you may have to match the openshift application (database, log locations, etc.). Commit your changes.
Pushing to openshift repo
We will now push the local branch to the openshift repo. This is not as simple as executing a git push, because the local branch is called openshift, but on the remote repository we want to update the master branch.
> git push openshift HEAD:master -f
This command will overwrite the remote repo with all local changes, because of the the -f flag. The HEAD:master parameter will tell git to push the branch to the master of the remote repo.
For any subsequent commits there is no need to specify -f again, because the repositories are now from the same source.
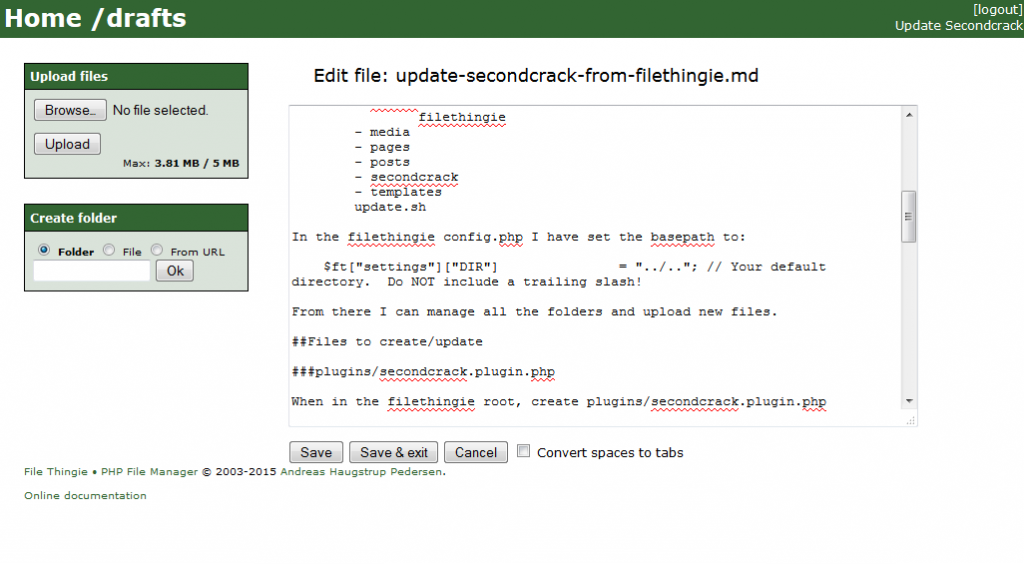
This blog post describes how to set up a filethingie installation and create a plugin to update your posts. It assumes that you already have a shell script in place to start the update of your blog.
Disclaimer: you are yourself responsible for securing the access to filethingie and the command to update secondcrack. For the first step simply point the filethingie basepath to the second crack basepath. I use:
Replace [the updatecommand] with the command you use to update secondcrack. I have created a small update.sh shell script that I placed in the root of the folder.
update.sh
#!/bin/sh

cd /srv/http/webapps/siteroot
/usr/bin/php ./secondcrack/engine/update.php >> /var/log/secondcrack.log 2>&1

echo "CLI: Executed update command for secondcrack."
This script assumes that there is a folder called secondcrack in the siteroot where the engine can be invoked.
When building the Chromium project I was looking for a way to restart the entire build. This means removing all output files, so that every buildstep is executed again. When a build is started the need to recompile the files is normally determined automatically (by date for example).
The build tool used by chromium is called ninja. After some searching I found that there is an option to execute so-called sublevel tools via the -t option. It turns out that there is a subtool called clean which will remove all output files.